All interactive tools and some other processing methods allow to select geometrical shapes on data with mouse: points, lines, rectangles, circles/ellipses. Existing selections can be similarly modified by dragging corners, endpoints, or complete selections. When mouse cursor is moved near to an editable point of a selection, is changes its shape to indicate the possibility to edit this point.
Each tool typically uses only one type of selection and when it is activated on a data window, it sets the selection mode to this type. Selections of other types than currently displayed are remembered and they are recalled when a tool which uses them is activated again. E.g. when you select several lines with Profile extraction tool, then switch to Statistical quantities (the lines disappear) and select a rectangular area to calculate its statistical characteristics, and then switch back to Profile extraction, the rectangle disappears and the lines appear again.
Tools that use the same type of selection – e.g. both Statistical functions and Statistical quantities use rectangular selection – share it. To calculate height distribution of the same rectangle you have selected for statistical quantities, it is sufficient to switch the tool.

If you save data in Gwyddion native file format
(.gwy), all selections are saved together with data
and recalled the next time the file is opened and appropriate tool
chosen.
Pressing Shift during selection restricts the degrees of freedom of the shape, making it easier to draw shapes from a specific subset. Specifically, pressing Shift restricts
- rectangular selections to perfect squares,
- elliptical selections to perfect circles, and
- directions of line selections to multiples of 15°.
The last modified shape can also be adjusted using the keyboard:
- arrow keys Left, Right, Up and Down move the point – for lines or rectangles this means the first point,
- holding Shift moves the other point instead for lines or rectangles, and
- holding another modifier key such as Alt or Ctrl moves the point by larger steps.
Several tools can hold the selection while switching between images. Meaning the selection is copied from the current image any image you switch to. It is enabled by checking Hold selection in the tool. Depending on the additional options, the current selection can be copied only to images which do not have any yet or replace existing selections.

The selection manager tool is a special tool that displays the list of all selections in an image and enables to copy them to other images.
For each selection, the tool shows the name, which is how the
selection is identified in the .gwy file; the
selection type and the number of objects (points, lines, rectangles, …)
selected. Usually, there is at most one selection of any type because
they are shared among the tools as
described above. Nevertheless,
sometimes there are special or private selections present as shown on the
following figure displaying two point-wise selections.
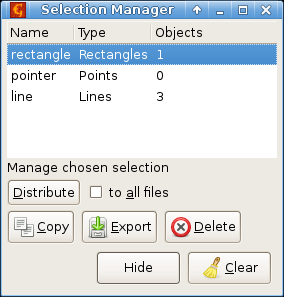
Selection chosen in the list is displayed in the data window.
It is possible to delete individual selections by choosing them in the list and pressing the Delete key or button – this is equivalent to clearing the selection in the corresponding tool. The button removes all selections.
However, the most interesting function of Selection Manager is selection copying. There are two ways to copy a selection to another image:
- Dragging a row from the selection list onto a data window copies the selection to this data window.
- Clicking the button copies the selection to all other images in the file. Or, if to all files is enabled, to all images in all open files.
Selections are copied only to images with compatible lateral units. This means that a selection in a normal image with meters as the lateral units will not be distributed to a two-dimensional PSDF image or a two-dimensional slope distribution.
If the physical dimensions of the target data are not sufficient to contain all the objects of the copied selection then only those objects that fit are copied (this can also mean nothing is copied).
The coordinates defining the chosen selection can be exported to the clipboard or a text file using and buttons. Each specific selection type is defined by its coordinates as described in the developer documentation: for instance points have two coordinates x and y, while rectangles have four that correspond to x and y of its two corners. The coordinates are always relative to top left image corner, even if the origin is not in the top left corner.